Mission Briefing: Blériot Airport
Welcome back to Shattergrounds: Mission Briefings, our series of articles where we break down the contested locations and their accompanying missions for the Infinity Shattergrounds Online Campaign. We’re into Phase 2 of the campaign now and all the areas have been reset with brand new missions to play, are there any of the missions from Phase 2 you are particularly looking forward to playing?
We’ll kick off our mission briefings with Location 1: Blériot Airport in the Lorena area.

It was an aviation pioneer who lent his name to the Lorena airport, one of the busiest on the planet, frequented mainly by the private jets of the corporate elite. Its state-of-the-art facilities can accommodate the smaller transorbital shuttles of the execs that need to commute from their offices in orbit to their vacation homes in Bois Bleu. However, Bureau Noir is believed to take advantage of this airport’s heavy traffic to mask the secret comings and goings of its operatives
A private airport which services the luxury jets and transorbital shuttles of the elite. As the effects of the nearby QAZ begin to get worse many of the well to do residents of Bois Bleu look to make their escape from Concilium via this airport, and they’ll try and take as much of their wealth with them as possible.
ALEPH wants to ensure that its reputation with the rich and powerful elite remains untarnished and there’s no better way to do this by saving them in their hour of need.
Nomads want to increase their reputation with the Elite of the Human Sphere and if any less than legal funds need to be evacuated off planet then Tunguska is always willing to help.
ALEPH starts with the advantage in this area with Nomads 2nd and all other factions 3rd.
Mission Overview
The mission for this location is Last Launch, a new mission for ITS 15 which is on Page 2 of the Phase 2 PDF.
This is a brand new mission for Infinity players and a very different style to other missions they might have played. It’s very thematic for this location as you can imagine each faction trying to get their VIP’s evacuated safely before the area gets enveloped by the QAZ.
The scoring for this mission is all based on end of game conditions and is as follows:
- 4 Objective Points for extracting more of your army points than the opponent by the end of the game
- 2 Objective Points for extracting more of your Specialist Troops then the opponent at the end of the game
- 2 Objective Points if you have killed more of the opponents Specialist Troops by the end of the game
- If you kill the same number of Specialist Troops as your opponent you both gain 1 Objective Point.
- 1 Objective Point is available for Dominating the central Launching Tower at the end of the game.
- Players also have one Classified Objective available worth 1 Objective Point.
To Score maximum points for this mission you will need to:
- Extract more army points than your opponent by the end of the game.
- Extract more Specialist Troops than your opponent by the end of the game.
- Kill more of the opponents Specialist Troops than you lose to them.
- Dominate the Launching Tower at the end of the game.
- Get the classified Objective
The Retreat rule is not applied in this mission so expect the game to last for the full three rounds.
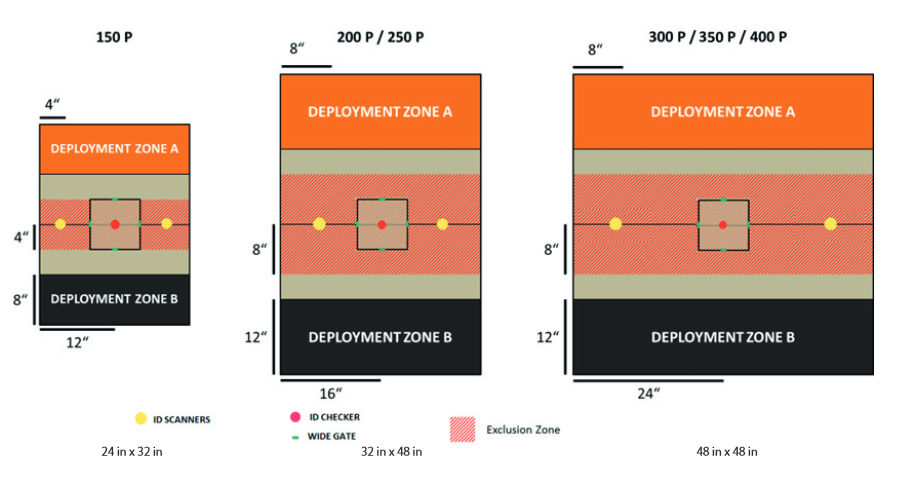
There’s an exclusion Zone that extends 8 inches either side of the table center that prevents any Airborne Deployment or Superior Deployment skill from deploying into it.
- Airborne Deployment covers the skills Combat Jump & Parachutist.
- Superior Deployment covers skills like Infiltration, Forward Deployment, Impersonation, basically any skill that lets you deploy outside your Deployment Zone.
- Note that ITS Season 15 has the BORDER SKIRMISHES extra which affects units with the Airborne Deployment skill.
BORDER SKIRMISHES
Once per game, each player can deploy a Trooper possessing a Special Skill with the Airborne Deployment (AD) Label inside any Exclusion Zone.
If the Trooper is using Combat Jump, no PH Roll is required, but they must deploy in Silhouette contact with the edge of the Exclusion Zone
- Units with Parachutist can walk onto the table via the short sides of the Exclusion Zone.
- Units with Combat Jump can be placed for free touching the long edges of the Exclusion Zone.
This mission uses the Objective Room terrain piece in the center of the table which is the Launching Tower and has the ID Checker in its middle. The Launching Tower is an 8 inch square room with 4 openings in the middle of each wall. You can use one of the many premade Objective Rooms available from different manufacturers or use your existing terrain pieces to mark it out.
- In game terms the Launching Tower is considered to have walls of infinite height that completely block Line of Fire.
- It has four Gates, one in the middle of each wall that are open at the start of the game. These gates must be represented by Wide Gate Tokens or scenery pieces with the same size.
There are two ID Scanners on the central line of the table, outside and on either side of the Launching Tower.
In order to Extract a unit via the Launching Tower they must accomplish two things.
- Get an ID Token from the ID scanner by either Downloading it or Swapping it from an allied unit with one already.
- Use the ID Token on the ID Checker in the center of the Launching Tower.
How do units Download and swap ID Tokens?
- Only Specialist Units can Download the ID Tokens from the ID Scanner by making a normal WIP roll while in base contact with it.
- Each Unit can only hold one ID Token but an allied unit can Swap an ID Token from another allied unt by being in silhouette contact and spending a short skill without a roll.
- Only models and not markers can have ID tokens so any Camouflaged, Impersonators or Holoecho units will lose their market state if they get an ID Token.
How do you Extract units from the Launching Tower?
- Units must move into silhouette contact with the ID Scanner in the center of the Launching Tower.
- Using the ID Scanner is a short skill with no roll is needed and the unit is Extracted at the end of the order in which they use this skill.
- A unit will count for extracted victory points even if they would have entered a null state at the conclusion of their order.
- Extracting a Unit takes any peripherals they have with them as long as they are in the Launching Tower.
- Extracting a unit means they are off the table so extracting your Lieutenant means you will be in Lossof Lieutenant at the start of the next turn and extracting a Link Team Leader will break a link.
- You can’t use coordinated orders to extract several units at once.
Dominating the Launching Tower is crucial for getting the maximum number of Objective Points in this mission.
- To Dominate the Launching Tower you must have more Victory Points than the opponent inside the area.
- Only Troopers represented by Models or Markers (Camouflaged, Shasvastii-Embryo, Seed-Embryo…) count, as well as Proxies and Peripheral Troops.
- Troops in a Null State do not count.
- Units with the Baggage Skill give an extra 20 points on top of their normal points cost when dominating the Panic Room..
- Note that in contrast to other area scoring missions, troopers possessing the Shasvastii Special Skill that are inside a the Launching Tower DO NOT COUNT for their points while they are in the Shasvastii-Embryo State or any non-Null State
- To Dominate the Launching Tower you’ll need unextracted units in it at the end of the game, so remember to keep someone behind in order to score this Objective..
Units with EVO Hacking have a special ability in this mission:
- Units with EVO Hacking Devices do not need an ID Token to use the ID Checker and get extracted.
General Mission Tips
Order efficiency is key in this mission, you’ll have a limited number of orders to extract as many units as possible and the extraction process is order intensive.
- You need one order to Download an ID Token, at least one order to make it to silhouette contact with the ID Scanner and then one more order to use the ID Scanner and be extracted.
- Thats 3 Orders per unit to be extracted and that’s also assuming they are a Specialist Trooper.
- If you need to Swap an ID Token then you’re adding one more order to the chain for a total of 4 orders needed to extract a unit.
- Given that your Order Pool will start with an average of 15 orders you’ll need to be very aware of how you spend your orders in this mission.
It’s probably a good idea to take as many specialist troops as possible for this mission as they can both Download ID Tokens and Extract themselves more efficiently than having to Swap them from other units which will rapidly reduce an order pool.
Infiltrating specialists have a limited use in this mission as the exclusion zone stops them from deploying near the ID Scanners or Launching Tower.
- However you can still deploy them outside your Deployment Zone in the 4 inch band between it and the Exclusion Zone which gets them a little closer to the ID Scanners.
- Plus if they are in a Marker state they may have an easier time getting to the ID Scanners.
- Alternatively you can try and deploy them outside your opponents Deployment Zone in the 4 inch band between it and the Exclusion Zone.
- This is a valid tactic for disrupting your opponents ability to get ID Tokens and extract their own units.
Parachutist and Combat Jump units can be of some use in this mission with ITS 15 rule Border Skirmishes rule in effect as outlined above.
- Pick a hardy Specialist unit if you’re going to do this, ideally a hacker.
Impetuous Specialist units can make use of their Impetuous order to be more order efficient in getting to the ID Scanner.
- Better yet fast moving Specialist Troopers on bikes can choose to be Impetuous and get themselves extracted in very few orders.
Link teams can get moved up to the Launching tower and get ready to be extracted using far fewer orders than would be needed for individual units.
- Obviously this is more relevant to Sectorial armies than the base factions but don’t forget that most of the base or “Vanilla” factions can take at least 2 Duo fireteams and these can often be high cost units.
Take plenty of units with extra order generating abilities like Impetuous, NCO and Tactical Awareness.
- Scour your army lists for units with these skills, most TAG’s get Tactical Awareness and several Lieutenant options bring one or more additional Lieutenant Orders that can be used by units with the NCO skill.
- Don’t forget the O-12’S PRESTIGE extra is in effect for all ITS15 missions which allows players to change a Command Token into a Regular Order once per round. Crucial for this mission given the need to be efficient with orders.
Take an EVO hacker unit if possible as getting them to the ID Checker will net you a lot of points for a low number of orders and they count as Specialist Troops as well.
- Most factions have access to a Remote with an EVO Hacking device with an AVA of 2. Although some factions can only take 1 unit with the skill and one faction can take 3.
Don’t concentrate too much on killing enemy units unless they are actively blocking your ability to extract your own units.
- There are more Objective Points on offer for getting your units off the table than killing the opponents specialists.
If you want that last Objective point for holding the Launching Tower then think carefully about which units you’ll leave behind.
- A high cost non-specialist Lieutenant might be a good option or some cheaper non-specialist units.
Due to the presence of the Exclusion Zone the Reinforcements Extra doesn’t bring any great benefits in this mission since units deployed this way will be prevented from deploying close to the Launching Tower and with their limited order pool will struggle to get extracted.
- Only really useful if you plan to Dominate the Launching Tower at the end of the game but otherwise I’d avoid using this extra.
Special Campaign Rules
The Special Campaign rules for this mission are PITCH BLACK, ASSURED SUPPORT and VANTAGE COMMAND.
PITCH BLACK means any units possessing Mimetism, Camouflage or a Terrain Special Skill get +3 modifier when declaring Dodge
- This is incredibly useful in this mission as active turn Dodging will allow units to move closer to the objective while hopefully avoiding any enemy fire or deployed weapons.
- Grabbing an ID Token and then Move-Dodgeing into the Launching Tower is a viable tactic in this mission especially if a unit has an existing Dodge Movement bonus.
ASSURED SUPPORT gives a +1 SWC Bonus to army creation for this mission.
- Very useful as it will allow you to afford more Specialist units which generally have at least a 0.5 SWC cost attached to them.
VANTAGE COMMAND gives the Lieutenants in this mission a +1 Lieutenant order.
- Very useful both for getting any high value Lieutenants extracted but also for giving multiple units with NCO extra orders to use.
- This bonus will stack with any existing Lieutenant order bonuses so consider taking someone who has access to extra Lieutenant orders if available.
Faction Focus
Let’s take a look at the ALEPH and Nomads Units that can be most useful in this mission.
Nomads
Nomads legendary infiltrating specialists not being able to infiltrate effectively really hurts their usefulness in this mission so consider putting the points and SWC that you would normally spend on them elsewhere.
- That said if you are willing to take the risk and roll to deploy an Infiltrator in the area in front of the opponents Deployment zone then Infiltrators with Deployable weapons and the Minelayer skill will be very effective.
- Moran Maasai are ideally suited for this task as they can use Minelayer to deploy their Crazykoala close to the opponents Deployment Zone, ready to give an explosive hug to the first thing that moves, they have template weapons and the option of a repeater to extend your hacking area.
Meteor Zonds, Tomcats and Hellcats are all worth considering as units with Airborne Deployment Skills to make use of the Border Skirmishes ability and deploy inside or touching the Exclusion Zone.
- All have access to at least one Specialist Unit profile with the Meteor Zond being very useful for its 6-4 Movement and in built repeater to extend your hacking area.
Reverend Morias are great for this mission as they have Mimetism -6 and NCO as standard as well as cheap Specialist Operative profile for 25 points.
- Their ability to go into Impetuous with Frenzy and to make use of the +3 to Dodge from PITCH BLACK will help them be order efficient either by themselves or in a link team.
- The same applies for any of their specialist variations like Custodiers, Healers and Mother Agatha who can act as the linchpin of an assault towards the central objective.
The Salyut Zond is the only EVO Hacker you have access to but is well worth bringing for the option to get 35 Victory points off the table quickly.
The Zondnautica Unit has a specialist hacker option, 8-4 MOV, can drop smoke grenades to cover its advance and if you choose to be Impetuous will be very order efficient.
If you want to take a TAG in this mission, the Gator or the Stigmata are your best options.
- The Gator has an NCO order to add to its Tactical awareness order for efficiency and its pilot is a Specialist unit who can carry the ID token back to the TAG if they dismount and activate the ID Scanner.
- The Stigmata is already a Specialist given its a hacker and with about 2 orders can Download and ID token and Extract off the table for 58 Points
The Daemonist Observant might be the most useful Lieutenant to take in this mission as its Lieutenant +1 order gets boosted to +2 orders giving you 3 Lieutenant orders to pump into your NCO units.
- Plus its Guard ability coupled with a Vulkan Shotgun will allow it to take and hold the Launching Tower until the end of the game.
ALEPH
Hector is almost the ideal Lieutenant to take in this mission, his +1 Lieutenant order gets bumped to +2 and when combined with Strategos Lv1 that gives you 4 regular orders for the price of one unit.
- Hector is almost a necessity if you are playing Steel Phalanx in this mission as the majority of your units are very expensive and you’ll need every order you can get.
Asuras are another good option for Lieutenants as they also have a standard +1 Lieutenant order which jumps to +2.
- Couple them with units who have the NCO Skill like Dasyus, Makhai or the characters Eudoros & Nesaie Alkê and you’ll have very order efficient Specialist units.
Scylla the Steel Phalanx Hacker has access to one of the few EVO Hacking Devices outside of the standard baggage remotes. She has the potential to get herself extracted off the table with very few orders for 42 Points as long as you keep her Devabot with her.
- Couple her with the 2 standard EVO Probot’s you can take in Vanilla ALEPH and you can get a massive 112 points off the table for next to no orders!
Garuda Tacbots and Ekdromoi are both excellent Airborne Deployment units that can use the Border Skirmishes ability and deploy inside or touching the Exclusion Zone.
- Garuda are fast with 6-4 Movement, have Mimetism -3 and have a good Specialist option for 20 points.
- Ekdromoi really shine in this mission as they are tough units both at range and in close combat, have Super Jump and Dodge +1 Inch as well as a Specialist option for 25 Points who has a +1 Bust Chain Rifle to clear out the Launching Tower if needed.
ALEPH have some great fireteam options for this mission depending on which sectorial you are playing.
- Devas, Dakini Tacbot’s, Yadu and Asura’s can all form the basis for high points fireteams with a few Specialist Units if playing Operations Subsection.
- Asura’s in particular are with a lot of points if they can be extracted.
- Steel Phalanx can take unlimited numbers of 4 man fireteams and most of their high cost Specialists can join at least one Fireteam option.
- It’s possible to take a team of high points cost Characters who are all Specialists and have them use Eclipse Smoke grenades to create an evacuation corridor to funnel units into the Launching Tower. It’s broken as hell.
ALEPH only has one Specialist Biker unit in Penthesilea but what a unit she is!
- Her 8-6 Movement, Mimetism -3, Dodge +2 Inches, Bioimmunity for ARM 3, Shock Immunity and her access to Smoke Grenades make her very fast and very survivable.
- However it is her Submachine Gun, Monofilament Close Combat Weapon, Nanopulser +1 Burst and CC -6 that make her an assassin in all but name.
- Use her either to score a quick 29 Points for extraction or have her take out an opponent’s expensive piece before they can extract it.

That’s all for the first Mission Briefing of Phase 2, what do you think of the Last Launch Mission and can you think of any novel tactics to secure victory, if so share them in the comments below.
We’ll be back soon with another Mission Briefing for the Shattergrounds Campaign.

Interesting mission
the mission map’s missing measurements though…
it was one of those useless private planes anyways 😀
I haven’t played Last launch yet, really curious to play it at least once because been a long time we haven’t got such a new fun mission in the ITS! (and the whole airport-thing narrative makes it even more fun to play)
Hmm, ok, there’s a no-space rule, the plane lands in fragments, and that’s a bad sign. (-_- )
Welcome to Blériot
__|__
–@–@–(_)–@–@–
! ! !